Using AI to make a rectangular box
The most troublesome thing about packing boxes is the gaps between the various parts after deformation. The following method we use can solve this problem very well. Each part is perfectly combined. And no perspective is used at all. Friends who do not have a basic art do not have to worry about it!
Key points: Rotary tool, tilt tool, free transform tool.
1. Use the Rectangle tool and draw an appropriately sized rectangle filled with RGB (181, 255, 31). This section will serve as the top of the box
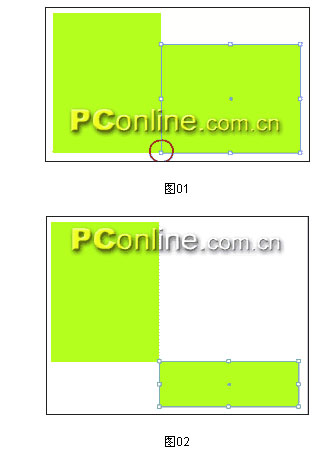
2. Select the Rotate tool, Alt-click the lower right corner of the rectangle, locate the center point of the change, in the dialog box that appears, the angle is -90, click on "Copy" (Fig. 01); move the copied rectangle straight down Move until the top edge of the rectangle is aligned with the bottom edge of the original rectangle; use the direct selection tool to select the copied rectangle, drag the bottom border, and shrink it to the proper size (Fig. 02). This is the side of the box.
3. Hold down Shift+Alt and drag the rectangle until the left edge of the copy is aligned with the left edge of the original rectangle, and then reduce the width so that the three parts are tightly connected together, filling RGB(4,191,0). This is We want to be the front part of the box. (Figure 03)
4. The following will look at you, add patterns, text for the box. (Because this article doesn't involve composition, the example here is just a simple one. There are misunderstandings in everyone!) (Fig. 04) If you have a text part in your diagram, remember to create an outline for the text. , otherwise it will be miserable when leading to other software. We'll combine your design diagrams with the three rectangles we just created.
5. Select the largest rectangle, hold down Alt and position the center point with the tilt tool, or the point we just highlighted (the center point in the following step is this point), set the tilt angle in the tilt dialog box For 30 degrees, the axis is horizontal, click OK; then use the rotation tool to change the center point and set the angle to -30 degrees to confirm. (Figure 05)
NANTONG OUFEIYA IMP& EXP CO.,LTD , https://www.jsnantongoufeiya.com